Quick Start Guide
Introduction into Self Sovereign Identity (SSI)
Self-sovereign identity (SSI) is complex. This Quick Start Guide explains the fundamental concepts to get up and running with Atala PRISM. This guide will familiarize you with the general concepts and how to create decentralized identifiers (DIDs), issue credentials, make connections, and verify credentials with verifiable presentations. Refer to the Concepts and Components sections for a more in-depth explanation.
The trust triangle is the most basic process for conveying trust in the digital world. There are three roles in an SSI ecosystem: Holders, Issuers, and Verifiers.
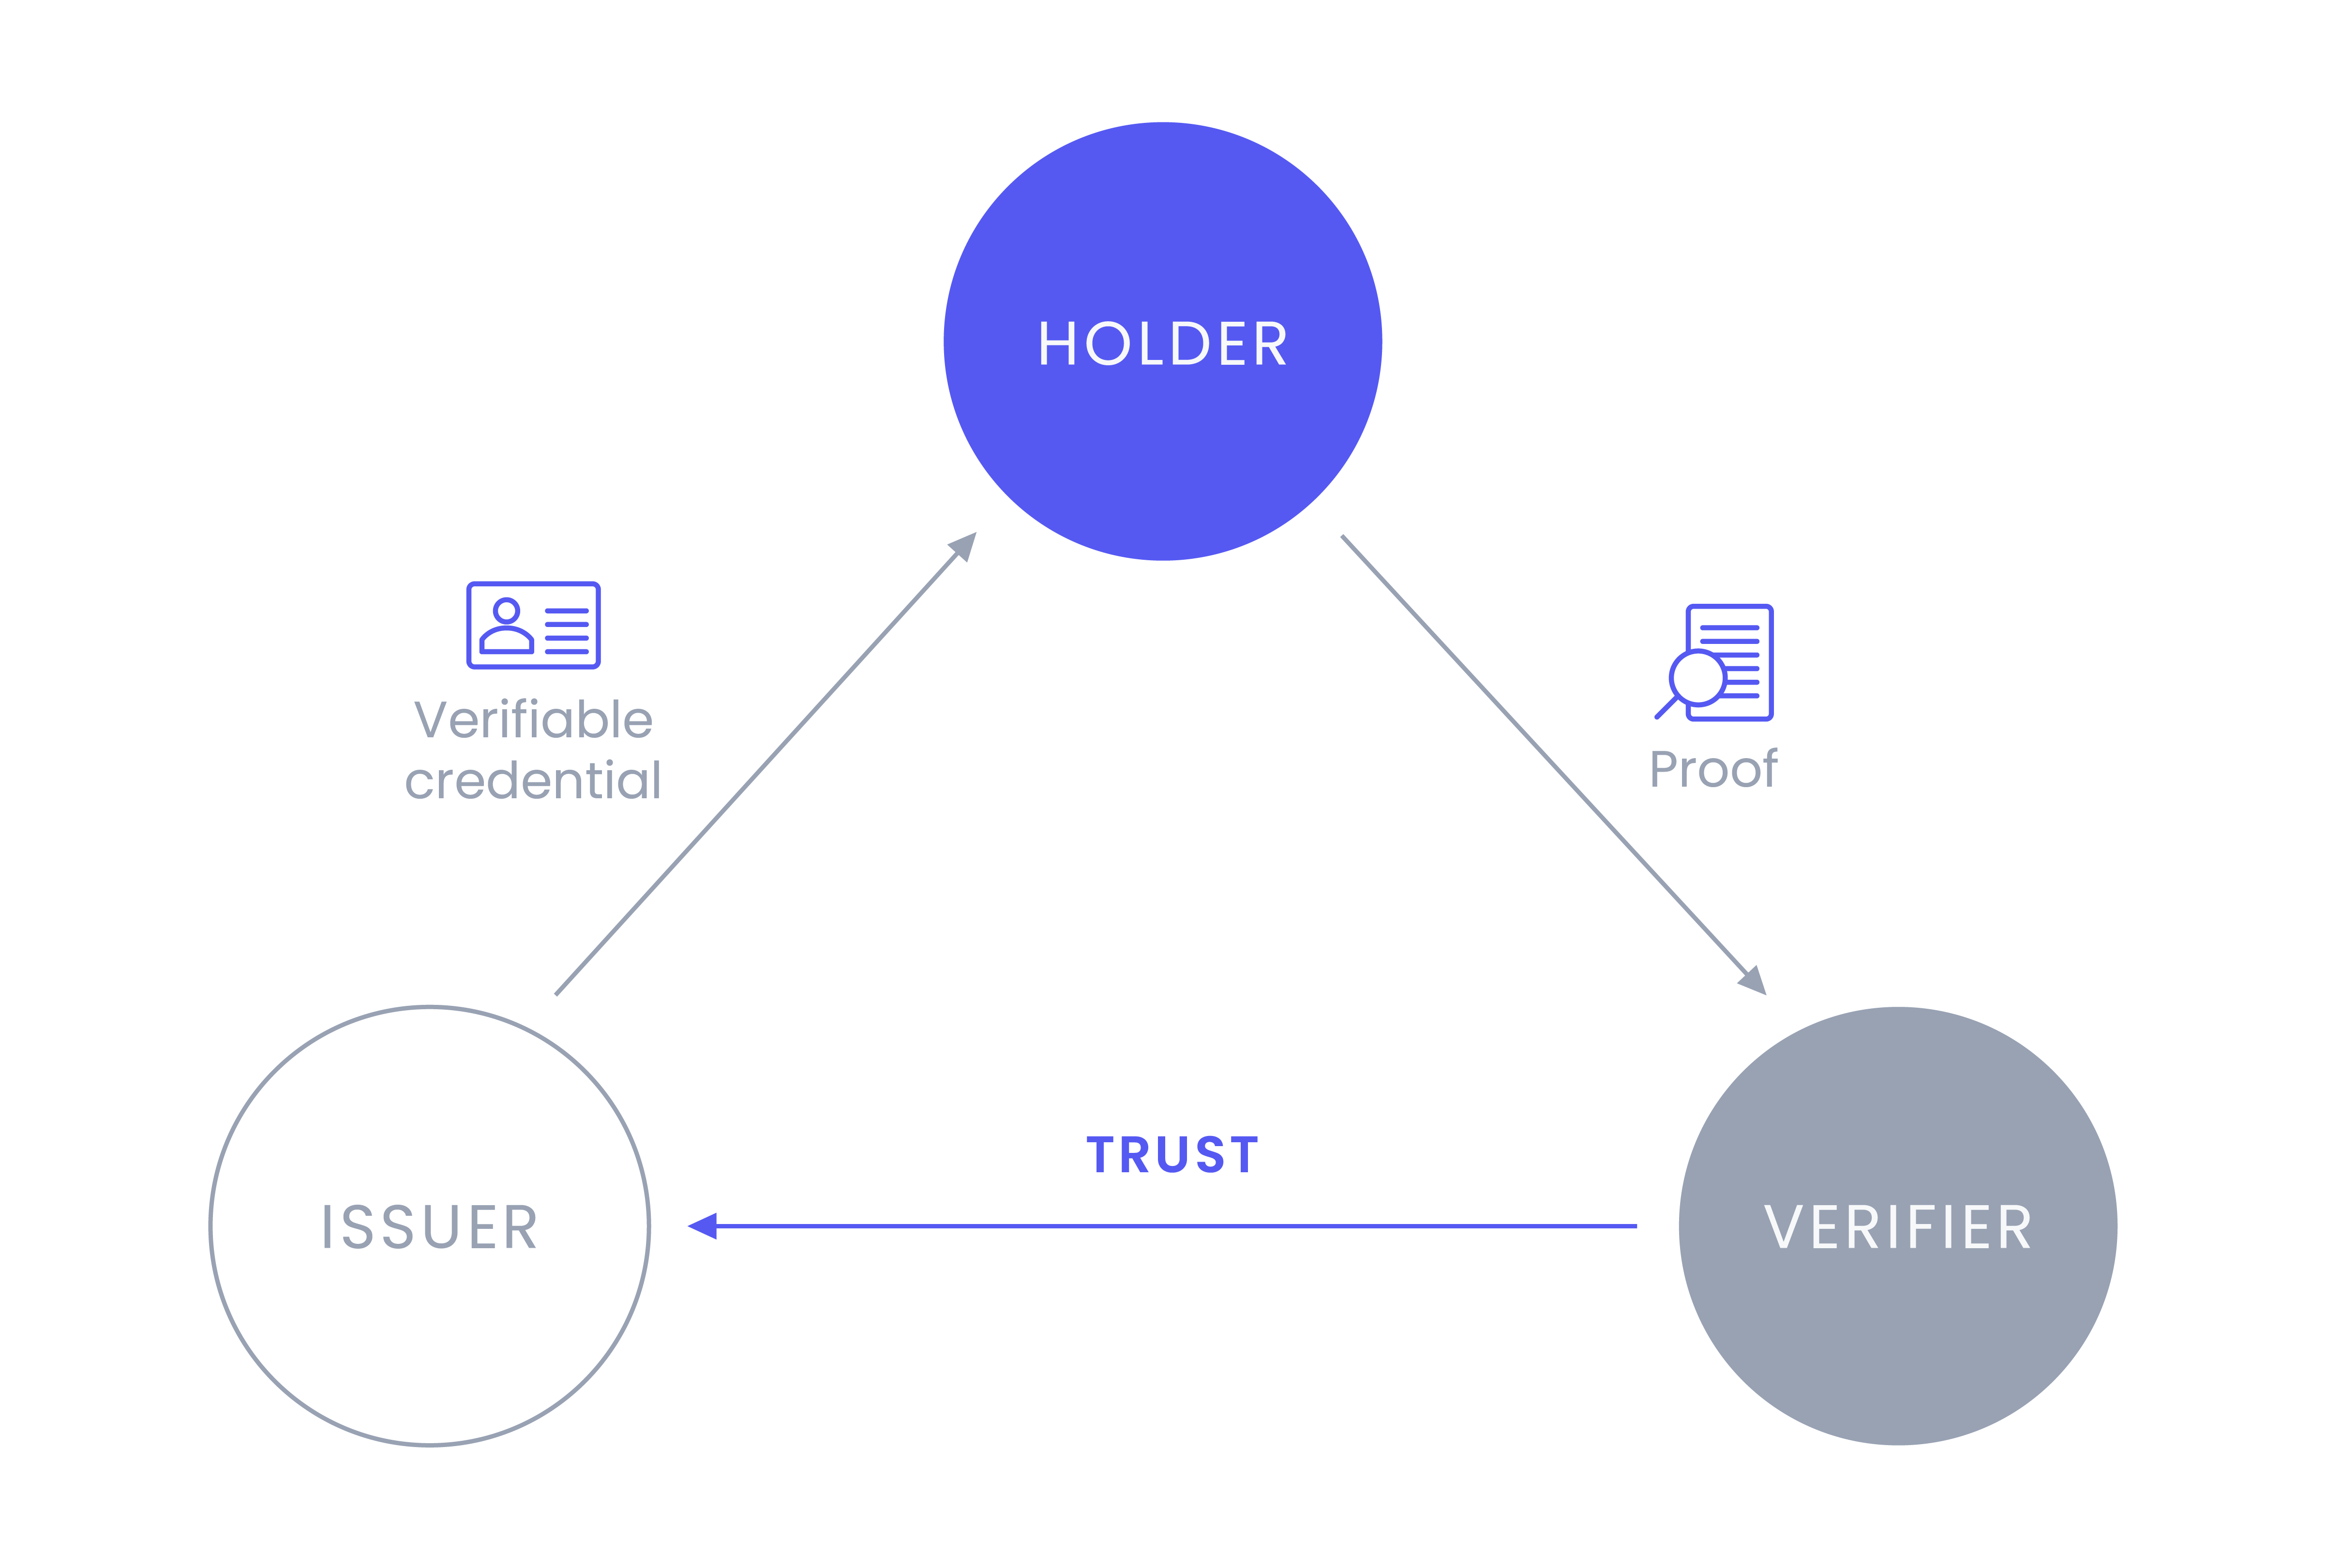
Holders can be any entity, such as individuals, organizations, and digital or physical things. They will hold verifiable credentials (VCs) and use a verifiable presentation to share their VCs.
Issuers can also be any entity that makes claims about an entity. These claims are attestations, or evidence of something, about the Holder. As an example, an insurance company would provide proof of valid insurance.
Verifiers are the relying party in the triangle. They will request information from the Holder, such as proof of insurance, and the Holder will use a verifiable presentation to share the appropriate VCs with the Verifier. The Holder's digital signature, the issuer DID get verified, and the contents therein to ensure nothing has been tampered with.
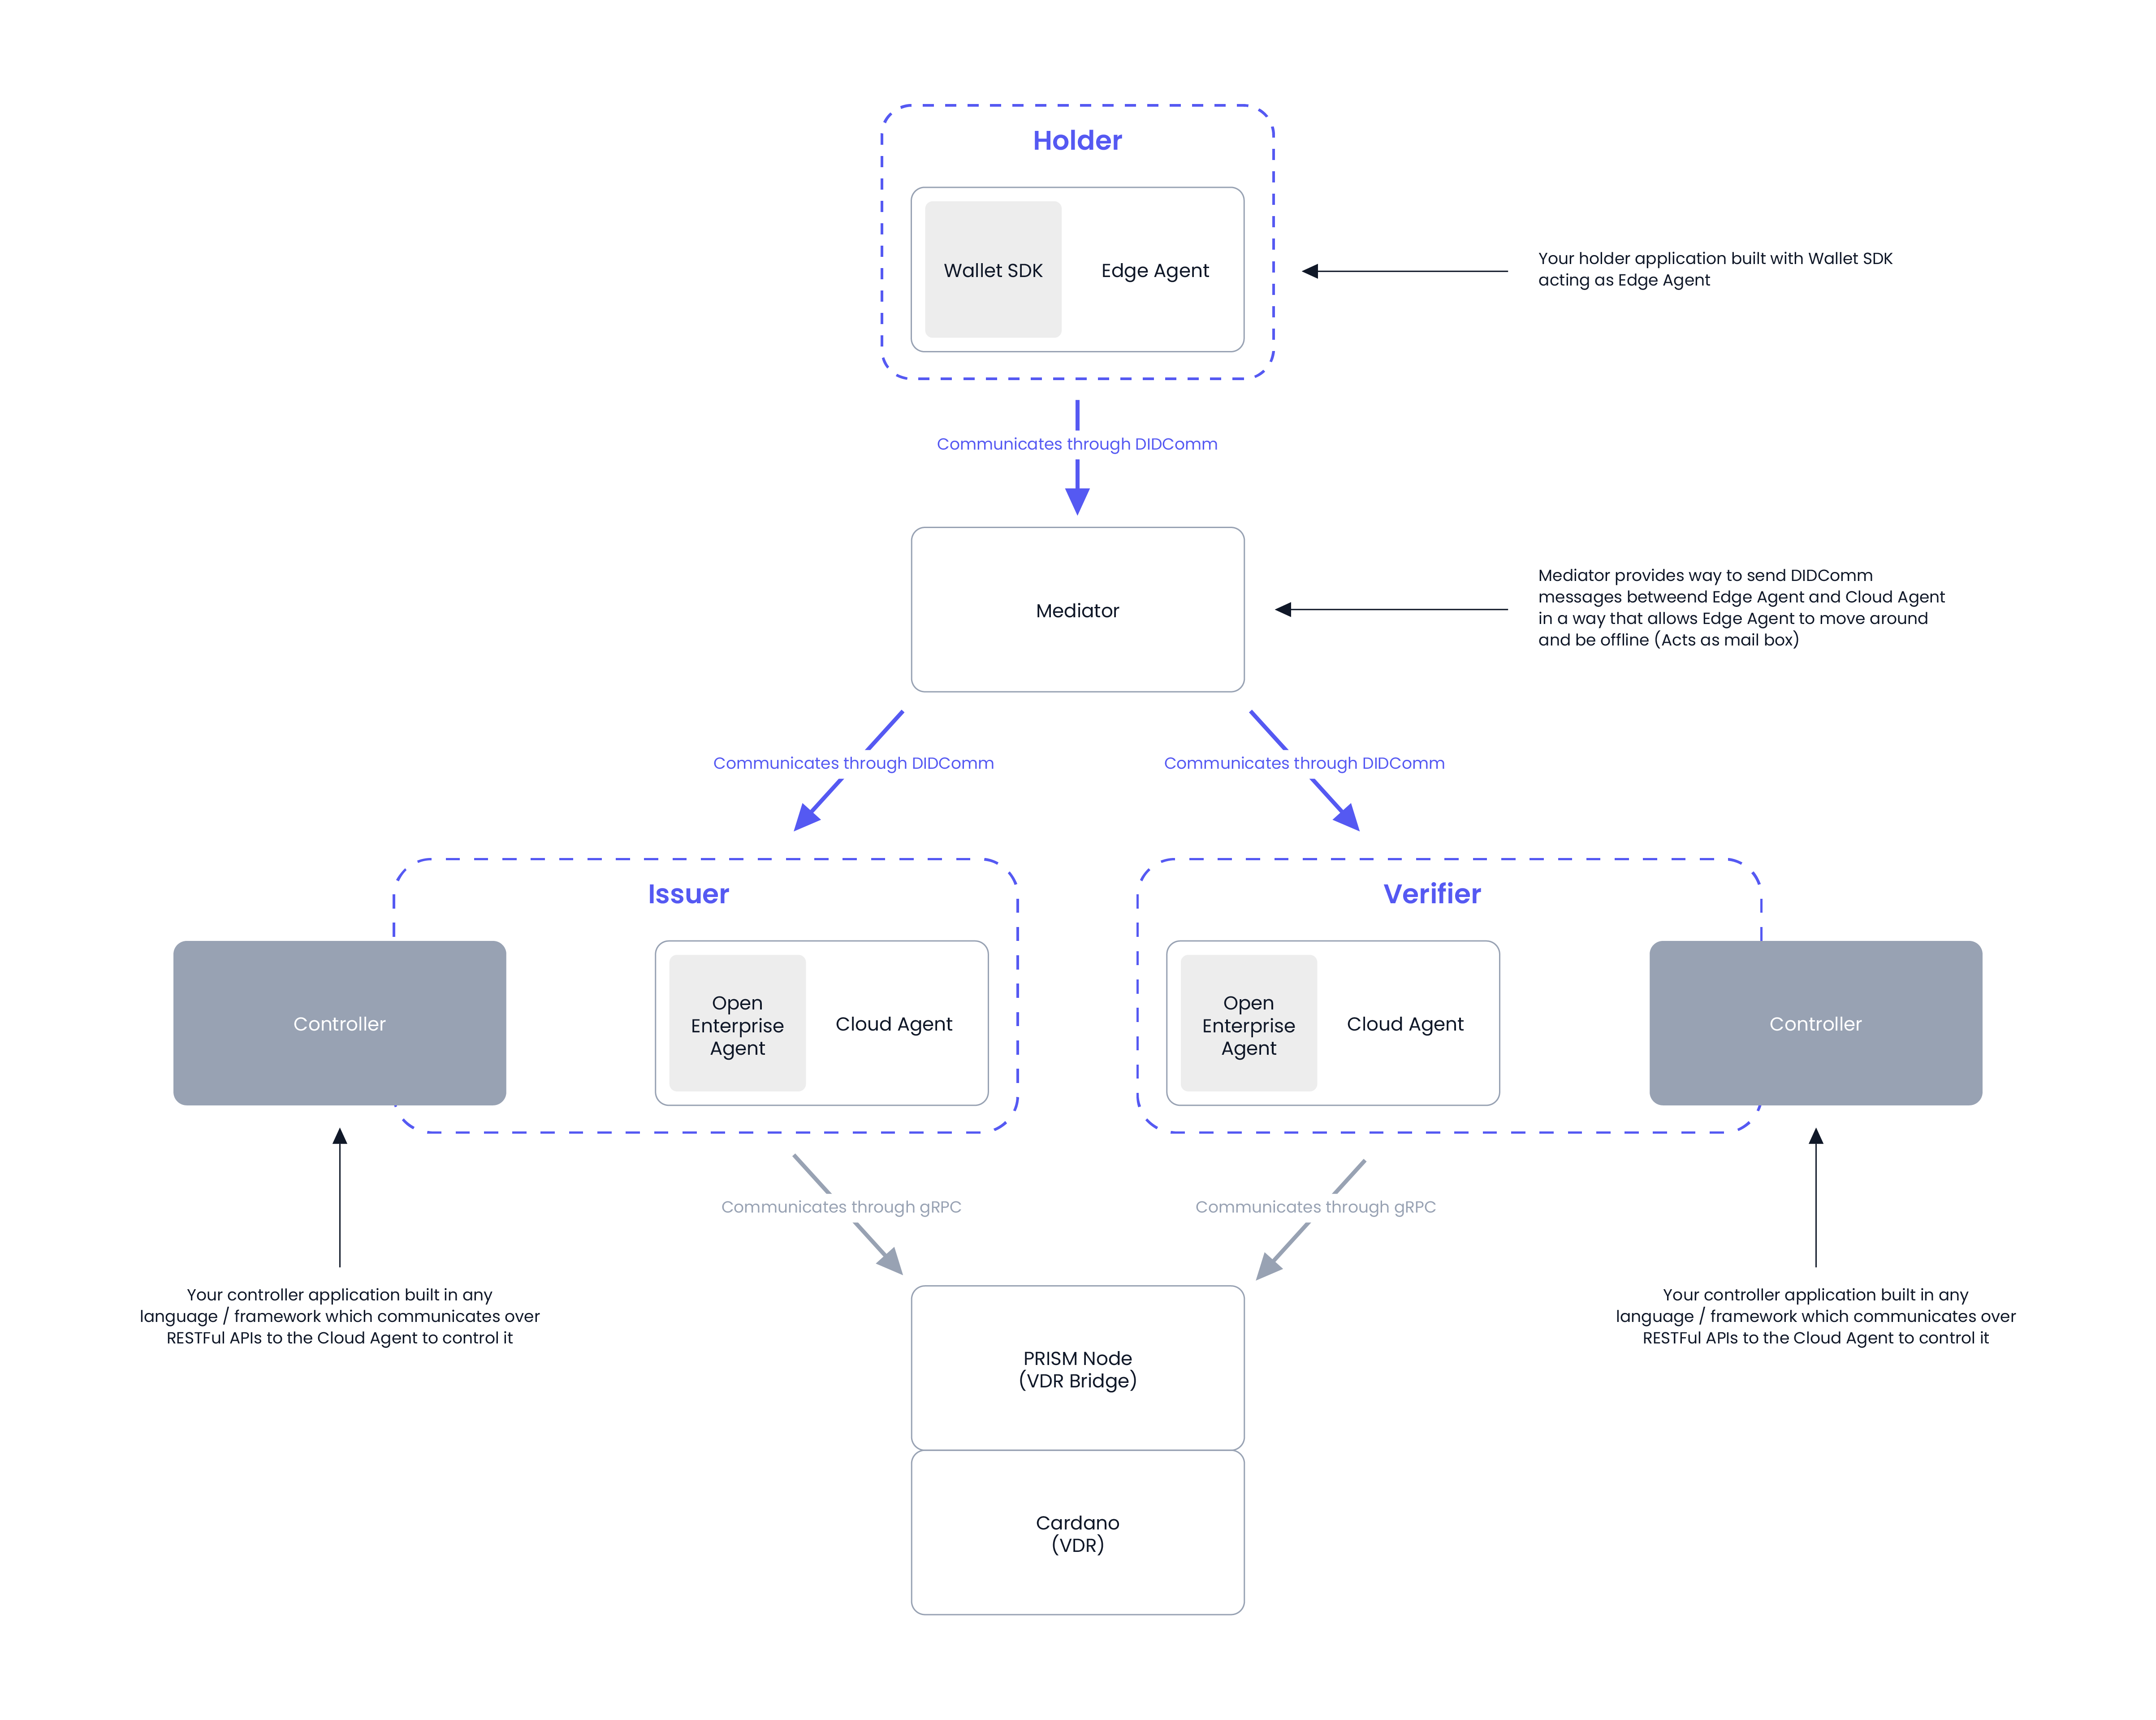
PRISM flow
The diagram details how the concepts fit alongside the PRISM components in a typical SSI interaction.
An overview of Atala PRISM components
Atala PRISM consists of core libraries that facilitate typical SSI interactions between Issuers, Holders, and Verifiers.
A Cloud Agent
A Cloud Agent can issue, hold, and verify verifiable credentials (VCs) for any entity and manage decentralized identifiers (DIDs) and DID-based connections. The Cloud Agent has an easy-to-use REST API to enable easy integration into any solution and uses DIDComm V2 as a messaging protocol for Cloud Agent-to-Cloud Agent communication.
It is maintained as an open source lab through the Hyperledger Foundation: Open Enterprise Agent.
More in depth documentation about Cloud Agent can be found here.
Wallet SDKs
Wallet SDKs for web and mobile (iOS, Android, TypeScript) enable identity holders to store credentials and respond to proof requests. They are typically used in applications that allow identity holders to interact with issuers and verifiers.
More in-depth documentation about the different Wallet SDKs can be found here (TypeScript, Swift, KMM)
A Mediator
Mediators are for storing and relaying messages between Cloud Agents and Wallet SDKs. They act as a proxy that remains connected to the network and receives any message, credential, or proof request on behalf of the Wallet SDKs (which can be offline occasionally).
More in-depth documentation about PRISM Mediator can be found here.
A Node for a Verifiable Data Registry (VDR)
To issue and verify VCs to and from DIDs, we need a Verifiable Data Registry (VDR) that is globally resolvable and always on. In PRISM's case, it is prism-node, anchoring key information required for issuance and verification on the Cardano blockchain.
PRE-REQUISITES
Agent Deployment
This guide will demonstrate a single-tenant deployment with API Key authentication disabled and an in-memory ledger for published DID storage, which is the simplest configuration to get started as a developer. More advanced configuration options can be found in Multi-Tenancy Management and associated Environment Variables configuration options.
We develop on modern machines equipped with either Intel based x64 processors or Apple ARM processors with a minimum of four cores, 16 GB of memory and 128GB+ of SSD-type storage.
- To spin up an Cloud Agent you must:
- Have Git installed.
- Have Docker installed.
- Clone the Open Enterprise Agent repository.
git clone https://github.com/hyperledger-labs/open-enterprise-agent
- Once cloned, create a new environment variable configuration file named ./open-enterprise-agent/infrastructure/local/.env-issuer to define the Issuer Agent with the following content:
API_KEY_ENABLED=false
PRISM_AGENT_VERSION=1.18.0
PRISM_NODE_VERSION=2.2.1
PORT=8000
NETWORK=prism
VAULT_DEV_ROOT_TOKEN_ID=root
PG_PORT=5432
- Create a new environment variable configuration file named ./open-enterprise-agent/infrastructure/local/.env-verifier to define the Verifier Agent with the following content:
API_KEY_ENABLED=false
PRISM_AGENT_VERSION=1.18.0
PRISM_NODE_VERSION=2.2.1
PORT=9000
NETWORK=prism
VAULT_DEV_ROOT_TOKEN_ID=root
PG_PORT=5433
- Setting the
API_KEY_ENABLEDtofalsedisables the requirement of using API Keys.
API_KEY_ENABLED disables API Key authentication. This should not be used beyond Development purposes.
- Start the
issuerandverifierCloud Agents by copy paste the below two lines in the command tool.
- Issuer Cloud Agent command: Mac OSX terminal shell
./infrastructure/local/run.sh -n issuer -b -e ./infrastructure/local/.env-issuer -p 8000 -d "$(ipconfig getifaddr $(route get default | grep interface | awk '{print $2}'))"
Linux terminal shell
./infrastructure/local/run.sh -n issuer -b -e ./infrastructure/local/.env-issuer -p 8000 -d "$(ip addr show $(ip route show default | awk '/default/ {print $5}') | grep 'inet ' | awk '{print $2}' | cut -d/ -f1)"
Verifier Cloud Agent command:
For Mac OSX terminal shell
./infrastructure/local/run.sh -n verifier -b -e ./infrastructure/local/.env-verifier -p 9000 -d "$(ipconfig getifaddr $(route get default | grep interface | awk '{print $2}'))"
For Linux terminal shell
./infrastructure/local/run.sh -n verifier -b -e ./infrastructure/local/.env-verifier -p 9000 -d "$(ip addr show $(ip route show default | awk '/default/ {print $5}') | grep 'inet ' | awk '{print $2}' | cut -d/ -f1)"
- The Issuer API endpoint will be accessible on port 8000
http://localhost:8000/prism-agent/with a Swagger Interface available athttp://localhost:8000/prism-agent/redoc.
- The Verifier API endpoint will be accessible on port 9000
http://localhost:9000/prism-agent/with a Swagger Interface available athttp://localhost:9000/prism-agent/redoc.
Agent configuration
Creating LongForm PrismDID
- Run the following API request against your Issuer API to create a PRISM DID:
curl --location \
--request POST 'http://localhost:8000/prism-agent/did-registrar/dids' \
--header 'Accept: application/json' \
--data-raw '{
    "documentTemplate": {
        "publicKeys": [
        {
          "id": "auth-1",
          "purpose": "authentication"
        },
        {
          "id": "issue-1",
              "purpose": "assertionMethod"
        }
      ],
      "services": []
    }
}'
- Create a PRISM DID operation and publish the DID by replacing
{didRef}with thelongFormDidoutput value from the previous create DID step.
curl --location \
--request POST 'http://localhost:8000/prism-agent/did-registrar/dids/{didRef}/publications' \
--header 'Accept: application/json'
- The short version of the did is the publishedPrismDID.
Learn more about PRISM DIDs and why it is necessary to publish specific DIDs here.
Create a credential schema (JWT W3C Credential)
- To create a credential schema on the Issuer instance, run the following request:
Replace the [[publishedPrismDID]] in the example request with the did value from the previous step.
- We need to capture the schema's guid as its used in further steps.
curl -X 'POST' \
  'http://localhost:8000/prism-agent/schema-registry/schemas' \
  -H 'accept: application/json' \
  -H 'Content-Type: application/json' \
  -d '{
  "name": "driving-license",
  "version": "1.0.0",
  "description": "Driving License Schema",
  "type": "https://w3c-ccg.github.io/vc-json-schemas/schema/2.0/schema.json",
  "author": [[publishedPrismDID]],
  "tags": [
    "driving",
    "license"
  ],
  "schema": {
    "$id": "https://example.com/driving-license-1.0.0",
    "$schema": "https://json-schema.org/draft/2020-12/schema",
    "description": "Driving License",
    "type": "object",
    "properties": {
      "emailAddress": {
        "type": "string",
        "format": "email"
      },
      "givenName": {
        "type": "string"
      },
      "familyName": {
        "type": "string"
      },
      "dateOfIssuance": {
        "type": "string",
        "format": "date-time"
      },
      "drivingLicenseID": {
        "type": "string"
      },
      "drivingClass": {
        "type": "integer"
      }
    },
    "required": [
      "emailAddress",
      "familyName",
      "dateOfIssuance",
      "drivingLicenseID",
      "drivingClass"
    ],
    "additionalProperties": true
  }
}'
Starting Sample App
All wallet SDK's come bundled with a sample application, that cover all the PRISM flows, including establishing connections, issuance, and verification flows.
- Typescript Sample APP
- Swift Sample APP
- Android Sample APP
- Clone the TypeScript SDK repository.
git clone https://github.com/input-output-hk/atala-prism-wallet-sdk-ts
- Ensure you have all applications installed for building the SDK and it's dependencies
rust and wasm-pack are leveraged to build and use the AnonCreds and DIDComm rust libraries within typescript. To build the SDK locally or run demonstration applications, you must have these applications installed.
The following should work Linux and MacOS, if you experience any issues - please check the latest installation instructions for your platform.
curl --proto '=https' --tlsv1.2 -sSf https://sh.rustup.rs | sh
curl https://rustwasm.github.io/wasm-pack/installer/init.sh -sSf | sh
- Run the following commands:
- Build the source SDK:
cd atala-prism-wallet-sdk-ts
git submodule update --init --recursive
npm i
npm run build
- Start the React demo:
cd demos/browser
npm i
npm run start
- This will start the react Wallet SDK TypeScript Demonstration at http://localhost:3000.
- Clone the Swift SDK repository.
git clone https://github.com/input-output-hk/atala-prism-wallet-sdk-swift
- Open the XCode project on ./Sample/AtalaPrismWalletDemo/AtalaPrismWalletDemo.xcodeproj
- On the top left of the XCode window you will see a play/run button, press it.
- The app will start.
- Click Wallet Demo 2.0
- You will be able to run the rest of the guide here.
- Clone the KMM SDK repository.
git clone https://github.com/input-output-hk/atala-prism-wallet-sdk-kmm
- Open the Wallet SDK project on IntelliJ or Android Studio.
- In the
Run configurationdropdown, select SampleApp. - Select the device or emulator you want to use.
- Click "Run".
- The SampleApp will launch on the applicable device or emulator.
Deploy & Establish Mediation
Mediation is the process that ensures messages get routed and stored correctly between Issuers, Verifiers and Holders, even if they are offline. The mediator offers a service that is always running and can securely store messages and deliver them to the associated DIDs using DIDComm. This enables use-cases where connectivity to a (mobile) wallet cannot be guaranteed.
Preparation
- To get the mediator deployed locally for the demo, clone the Mediator repository.
git clone https://github.com/input-output-hk/atala-prism-mediator
- With a Docker service running, open a new terminal and run:
The latest mediator version can be found at Mediator releases. Change the version in the example if you want to use the latest version.
MEDIATOR_VERSION=0.10.2 docker-compose up
MEDIATOR_ENDPOINT is then set to http://localhost:8080.
- More advanced documentation and configuration options can be found here.
- Now you need to capture the Mediator's Peer DID in order to start DIDCOMM V2 Mediation protocol, you can do so by opening you browser at the mediators endpoint.
Demo application
In order to complete this step you'll need to connect to the mediators Peer DID which you can fetch by making the following API request.
curl --location \
--request GET 'localhost:8080/invitation' \
--header 'Content-Type: application/json'
Follow the steps in your desired platform as stated below:
- Typescript Sample APP
- Swift Sample APP
- Android Sample APP
- Open http://localhost:3000 in your browser, paste the mediator peer DID (obtained from the
fromattribute after fetching from the mediator's invitation endpoint), and click Start after.
- In the app, go to Wallet Demo, and on the Mediator tab, insert the mediator DID.
- Go back to the Sample app. In the main screen, you can provide the mediator DID of your choice or use that is there already. Proceed and click Start after.
- If you are running the SampleApp, click the Start Agent button.
The below code examples show how to establish mediation when building your own application.
Code examples
- Typescript
- Swift
- Android
  const mediatorDID = SDK.Domain.DID.fromString(
    [[MEDIATOR DID PEER]]
  );
  const api = new SDK.ApiImpl();
  const apollo = new SDK.Apollo();
  const castor = new SDK.Castor(apollo);
  const didcomm = new SDK.DIDCommWrapper(apollo, castor, pluto);
  const mercury = new SDK.Mercury(castor, didcomm, api);
  const store = new SDK.PublicMediatorStore(pluto);
  const handler = new SDK.BasicMediatorHandler(mediatorDID, mercury, store);
  const manager = new SDK.ConnectionsManager(castor, mercury, pluto, handler);
  const seed = apollo.createRandomSeed()
  const agent = new SDK.Agent(
    apollo,
    castor,
    pluto,
    mercury,
    handler,
    manager,
    seed.seed
  );
   /**
   * This internally will attempt to load an existing mediator from the
   * database. If it does not exist it will try to achieve mediation
   * automatically, by creating a PeerDID and sending a MediationRequest.
   * After this step the mediator starts capturing messages for the PeerDID we specied.
   */
  await agent.start()
  let agent = PrismAgent(mediatorDID: did)
  try await agent.start()
  agent.startFetchingMessages()
val apollo = ApolloImpl()
val castor = CastorImpl(apollo)
val pluto = Pluto(DbConnection())
(pluto as PlutoImpl).start(context)
val mercury = mercury = MercuryImpl(
    castor,
    DIDCommWrapper(castor, pluto, apollo),
    ApiImpl(httpClient())
)
val pollux = PolluxImpl(castor)
val seed = apollo.createRandomSeed()
val handler = BasicMediatorHandler(
  mediatorDID = DID(<DID_STRING>),
  mercury = mercury,
  store = BasicMediatorHandler.PlutoMediatorRepositoryImpl(pluto)
)
agent = PrismAgent(
    apollo = apollo,
    castor = castor,
    pluto = pluto,
    mercury = mercury,
    pollux = pollux,
    seed = seed,
    mediatorHandler = handler
)
agent.start()
agent.startFetchingMessages()
Establish Holder connections
To connect the Holder to both Cloud Agent instances, you must run this in both Issuer and Verifier endpoints.
Establish a connection - Agent side
A connection must be established between the Holder and PRISM Cloud Agents to correctly deliver the Issuance + Verification Messages to the Holder.
Establish connection on the Issuer Cloud Agent
curl --location \
--request POST 'http://localhost:8000/prism-agent/connections' \
--header 'Content-Type: application/json' \
--data-raw '{
    "label": "Prism Agent demo connection with holder"
}'
- This request will return a JSON response with an invitation and its URL. The Issuer Cloud Agent would share this URL as a QR code, and the holder would scan it with the wallet app.
- Copy the
invitationUrland theconnectionId.
Establish connection on the Verifier Cloud Agent
curl --location \
--request POST 'http://localhost:9000/prism-agent/connections' \
--header 'Content-Type: application/json' \
--data-raw '{
    "label": "Prism Agent demo connection with holder"
}'
- This request will return a JSON response with an invitation and its URL. The Verifier Cloud Agent would share this URL as a QR code, and the holder would scan it with the wallet app.
- Copy the
invitationUrland theconnectionId.
Establish a connection - Holder side
- Now that you have the invitation, it's time for the Holder to accept it.
Demo application
- Typescript Sample APP
- Swift Sample APP
- Android Sample APP
- Open a browser at localhost:3000.
- Start the Edge Agent by clicking the button.
- Paste the invitation URL generated in the previous step into the
PrismAgentconnection section and click on Create Connection.
- The application will react when the connection gets established correctly and show a new connection.
- On the OOB dialog, paste the invitation URL we generated into the
PrismAgentconnection section and click Validate.
- The application will respond once the connection gets established correctly and show a message under messages.
- Go back to the Application:
- Click the floating button at the bottom right corner of the Contacts tab.
- On the dialog, paste the invitation URL we generated into the
PrismAgentconnection section and click Validate.
- The application will react once the connection gets established correctly and show a message under messages.
Code examples
- Typescript
- Swift
- Android
const parsed = await props.agent.parseOOBInvitation(new URL([[OOB URL]]));
await props.agent.acceptDIDCommInvitation(parsed);
  let message = try agent.parseOOBInvitation(url: oobUrl)
  try await agent.acceptDIDCommInvitation(invitation: message)
val invitation = agent.parseInvitation(oobUrl)
agent.acceptOutOfBandInvitation(invitation)
Issue a Credential from the Issuer to the holder
The credential issuance flow consists of multiple steps, detailed in this section. It starts with the Issuer sending a Credential Offer to the Holder, which would accept or reject this invitation and create a credentialRequest from it. The credential request gets sent through DIDComm to the Issuer, issuing and sending the credential back to the Holder.
Create a Credential Offer Issuer Agent
- To trigger the creation of a credential-offer, we call the credential-offers-endpoint, as follows:
Please replace the following variables in the example request before sending:
connectionId: The ID of the connection previously established between agent and holder. This is part of the response of the POST message from the agent when calling theprism-agent/connectionsendpoint. It is returned in theconnectionIdattribute. There is a unique connection ID for the relationship between issuer and holder and verifier and holder. In this example, please use theconnectionIdreturned when creating the connection between issuer and holderpublishedPrismDID: The short form of the PRISM DID created when setting up the Issuer agent
The connectionId is just the ID of the connection we previously established with the issuer.
The Issuing DID is the published PRISM DID in its short version which was also used to create and publish the credential schema.
- ``
curl --location --request POST 'http://localhost:8000/prism-agent/issue-credentials/credential-offers' \
--header 'Content-Type: application/json' \
--data-raw '{
    "claims": {"emailAddress":"sampleEmail", "familyName":"", "dateOfIssuance":"2023-01-01T02:02:02Z", "drivingLicenseID":"", "drivingClass":1},
    "connectionId": [[connectionId]],
    "issuingDID": [[publishedPrismDID]],
    "automaticIssuance": true
}'
Create CredentialRequest from CredentialOffer Holder
- Because this credential Offer was created with the
automaticIssuancetrue, as soon as thePrismAgentreceives thiscredentialRequestit will respond with theIssuedCredentialmessage and send this back to the holder.
automaticIssuance is optional. It can also be manually triggered and confirmed by the Holder.```
Demo application
- The holder will at some point receive a
CredentialOffer, which the holder must accept, and then, aCredentialRequestis created and sent back to the Issuer through DIDComm V2 protocols.
- Typescript Sample APP
- Swift Sample APP
- Android Sample APP
CredentialOffer message will be automatically accepted as soon as it reaches the browser. In exchange, a CredentialRequest message will get sent back to the `PrismAgent.`CredentialOffer message reaches the Swift mobile app, it will display to the user to accept or reject, and in exchange, a CredentialRequest message will get sent back to the PrismAgent.CredentialOffer message reaches the Android mobile app, it will be automatically accepted, and in exchange, a CredentialRequest message will get sent back to the PrismAgent.Code examples
- The exchange between CredentialOffer and CredentialRequest is demonstrated through more advanced code samples below, showcasing how different platforms handle it.
- Typescript
- Swift
- Android
props.agent.addListener(ListenerKey.MESSAGE,async (newMessages:SDK.Domain.Message[]) => {
    //newMessages can contain any didcomm message that is received, including
    //Credential Offers, Issued credentials and Request Presentation Messages
    const credentialOffers = newMessages.filter((message) => message.piuri === "https://didcomm.org/issue-credential/2.0/offer-credential");

    if (credentialOffers.length) {
        for(const credentialOfferMessage of credentialOffers) {
        const credentialOffer = OfferCredential.fromMessage(credentialOfferMessage);
        const requestCredential = await props.agent.prepareRequestCredentialWithIssuer(credentialOffer);
        try {
            await props.agent.sendMessage(requestCredential.makeMessage())
        } catch (err) {
            console.log("continue after err", err)
        }
        }
    }
})
agent
  .handleMessagesEvents()
  .sink(receiveCompletion: { _ in }, receiveValue: { [weak self] in
    guard
        let message,
        message.direction == .received,
        let msgType = ProtocolTypes(rawValue: message.piuri)
      else { return }

      Task.detached { [weak self] in
          do {
            switch msgType {
             case .didcommOfferCredential:
                let newPrismDID = try await agent.createNewPrismDID()
                guard let requestCredential = try await agent.prepareRequestCredentialWithIssuer(
                    did: newPrismDID,
                    offer: try OfferCredential(fromMessage: message)
                ) else { throw UnknownError.somethingWentWrongError() }

                _ = try await agent.sendMessage(message: try requestCredential.makeMessage())
          } catch {}
      }
  })
agent.handleReceivedMessagesEvents().collect { list ->
    list.forEach { message ->
        if (message.piuri == ProtocolType.DidcommOfferCredential.value) {
            val credentials = pluto.getAllCredentials().first()
            if (credentials.isEmpty()) {
                val offer = OfferCredential.fromMessage(message)
                val subjectDID = agent.createNewPrismDID()
                val request =
                agent.prepareRequestCredentialWithIssuer(
                    subjectDID,
                    offer
                )
                mercury.sendMessage(request.makeMessage())
            }
        }
    }
}
Store the Issued Credential [Holder]
The sample application are using an insecure storage solution which should only be used for testing purposes and not production environments!
Code examples
- Typescript
- Swift
- Android
props.agent.addListener(ListenerKey.MESSAGE,async (newMessages:SDK.Domain.Message[]) => {
    //newMessages can contain any didcomm message that is received, including
    //Credential Offers, Issued credentials and Request Presentation Messages
    const issuedCredentials = newMessages.filter((message) => message.piuri === "https://didcomm.org/issue-credential/2.0/issue-credential");
    if (issuedCredentials.length) {
        for(const issuedCredential of issuedCredentials) {
            const issueCredential = IssueCredential.fromMessage(issuedCredential);
            await props.agent.processIssuedCredentialMessage(issueCredential);
        }
    }
})
agent
  .handleMessagesEvents()
  .sink(receiveCompletion: { _ in }, receiveValue: { [weak self] in
    guard
        let message = $0
        message.direction == .received,
        let msgType = ProtocolTypes(rawValue: message.piuri)
      else { return }

      Task.detached { [weak self] in
          do {
            switch msgType {
              case .didcommIssueCredential:
                  let issueCredential = try IssueCredential(fromMessage: message)
                  _ = try await agent.processIssuedCredentialMessage(message: issueCredential)
            }
          } catch {}
      }
  })
agent.handleReceivedMessagesEvents().collect { list ->
    list.forEach { message ->
        if (message.piuri == ProtocolType.DidcommIssueCredential.value) {
                agent.processIssuedCredentialMessage(
                    IssueCredential.fromMessage(
                    message
                )
            )
        }
    }
}
Request a verification from the Verifier Cloud Agent to the Holder (JWT W3C Credential)
Now that the Holder has received a credential, it can be used in a verification workflow between a Holder and a Verifier. This requires the following steps:
- Verifier creates a proof request
- Holder receives the proof request
- Holder creates a proof presentation and shares this with the verifier
- Verifier verifies the proof presentation
In the example, we show a verification flow that assumes a connection between Holder and Verifier. In the future, we will also support connectionless verification.
Verifier Agent
- To run this section, we will use the connection we created between the Holder and the Verifier.
curl --location \
--request POST 'http://localhost:9000/prism-agent/present-proof/presentations' \
--header 'Content-Type: application/json' \
--data-raw '{
    "connectionId": [[connectionId]],
    "proofs": [
        {
            "schemaId": [[schemaId]],
            "trustIssuers": [
                [[PUBLISHED PRISM DID FROM THE ISSUER]]
            ]
        },
    ],
    "options": {
        "challenge": "A challenge for the holder to sign",
        "domain": "domain.com"
    }
}'
- This API request will return a
presentationRequestId,which the verifier can use later to check the request's current status.
Holder: Receives the Presentation proof request
- The Holder needs an Edge Agent running with the message listener active. It will receive the presentation proof request from the Verifier Cloud Agent for the correct type of messages as detailed below:
Code examples
- Typescript
- Swift
- Android
props.agent.addListener(ListenerKey.MESSAGE,async (newMessages:SDK.Domain.Message[]) => {
    //newMessages can contain any didcomm message that is received, including
    //Credential Offers, Issued credentials and Request Presentation Messages
    const requestPresentations = newMessages.filter((message) => message.piuri === "https://didcomm.atalaprism.io/present-proof/3.0/request-presentation");

    if (requestPresentations.length) {
        for(const requestPresentation of requestPresentations) {
            const lastCredentials = await props.pluto.getAllCredentials();
            const lastCredential = lastCredentials.at(-1);
            const requestPresentationMessage = RequestPresentation.fromMessage(requestPresentation);
            try {
            if (lastCredential === undefined) throw new Error("last credential not found");

            const presentation = await props.agent.createPresentationForRequestProof(requestPresentationMessage, lastCredential)
            await props.agent.sendMessage(presentation.makeMessage())
            } catch (err) {
            console.log("continue after err", err)
            }
        }
    }
})
agent
  .handleMessagesEvents()
  .sink(receiveCompletion: { _ in }, receiveValue: { [weak self] in
    guard
          let message,
          message.direction == .received,
          let msgType = ProtocolTypes(rawValue: message.piuri)
      else { return }

      Task.detached { [weak self] in
        do {
          switch msgType {
          case .didcommRequestPresentation:
              let credential = try await agent.verifiableCredentials().map { $0.first }.first().await()
              guard let credential else {
                  throw UnknownError.somethingWentWrongError()
              }
              let presentation = try await agent.createPresentationForRequestProof(
                  request: try RequestPresentation(fromMessage: message),
                  credential: credential
              )
              _ = try await agent.sendMessage(message: try presentation.makeMessage())
          }
        } catch {}
      }
  })
agent.handleReceivedMessagesEvents().collect { list ->
    list.forEach { message ->
        if (message.piuri == ProtocolType.DidcommRequestPresentation.value && !presentationDone) {
            viewModelScope.launch {
                presentationDone = true
                agent.getAllCredentials().collect {
                    val credential = it.first()
                    val presentation = agent.preparePresentationForRequestProof(
                        RequestPresentation.fromMessage(message),
                        credential
                    )
                    mercury.sendMessage(presentation.makeMessage())
                }
            }
        }
    }
}
Verifier: Will then check on the API if the Presentation Request has been completed or not.
curl --location \
--request GET 'http://localhost:9000/prism-agent/present-proof/presentations/[[presentationRequestId]]' \
--header 'Accept: application/json'
- The response body establishes the completion of the request and can be verified for correctness.